Add timeless charm and texture to any facade with Weathertex Shingles; the stylish, natural timber cladding that makes an instant impact. Perfect for creating feature walls, gable ends, or full exterior finishes, Weathertex Shingles combine the beauty of classic timber with the durability to handle Australia’s harshest conditions. They offer endless design possibilities – from coastal chic to modern rustic – all while being 100% natural, sustainable, and easy to install.
CLASSIC SHINGLES PLUS
SHINGLES PLUS INSTALLATION METHOD:
Shingles are the only product in the Weathertex Natural range that Weathertex permits painting. If you are painting the shingles you will need to use a high quality tannin blocking exterior timber primer (water or solvent based) to prime the shingles and any cut edges. (Natural Shingles can be painted without impacting warranty.)
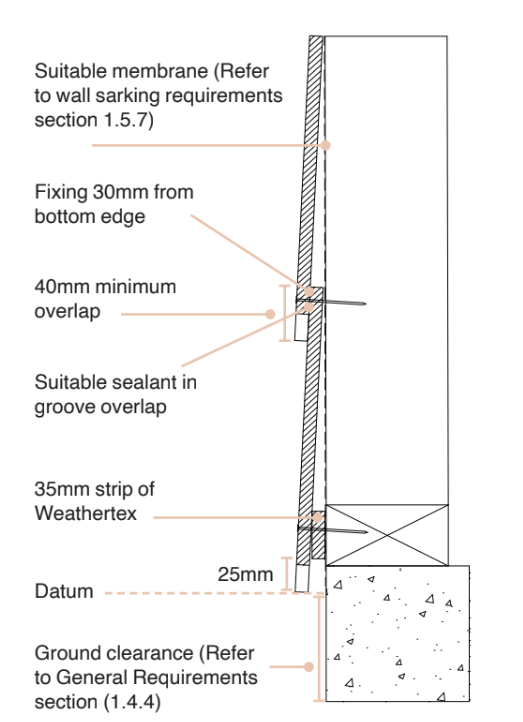
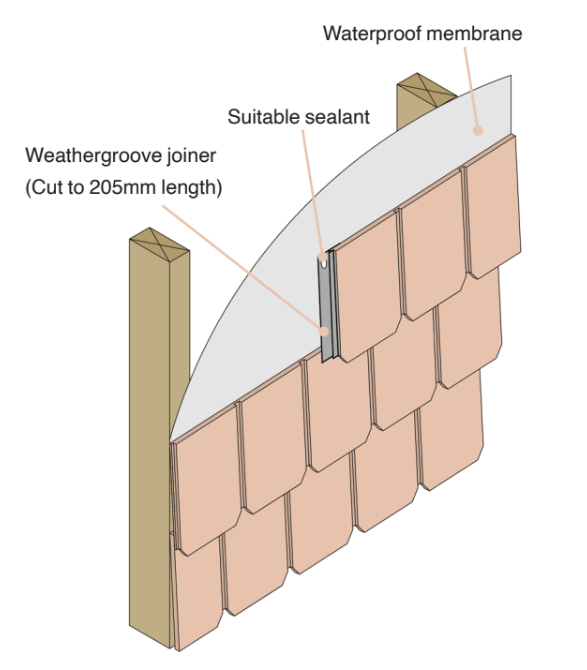
First Row: Set a horizontal datum line to align the first row. Allow a minimum overlap of 40mm. Fix a 35mm x 9.5mm strip of Weathertex 25mm up from the datum. Level the bottom edge of the board with the datum line. Fasten the bottom edge through the Weathertex strip into the timber framing. Cut Weathergroove joiner into 205mm joiners, fit these joiners as work proceeds. Where weathertightness is required add a bead of suitable sealant in each groove where the next row overlaps.
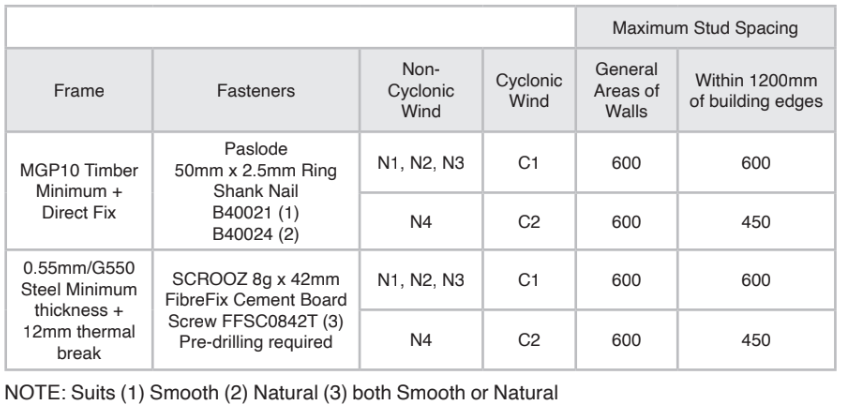
Successive Rows: Use the storey rod or lap gauge to position weatherboards and maintain uniform rows. Check rows for level. At laps, fasten through both Shingles into the stud. Use one fastener per stud, located at least 30mm from bottom edges and 12mm from ends. Fasteners per fastening guide for classic boards.
Please refer to construction details found on the Weathertex website for window, doors and penetrations installation.
JOINING SHINGLES PLUS:
Form joins between weatherboard ends using the 205mm cut lengths of Weathergroove joiner – refer to the Accessories Section. Add a small bead of polyurethane sealant/ adhesive at the top of the joiner under the lap to ensure that the joiner cannot slip. Stagger joins randomly or brick lay throughout the wall with joins being formed midway between the studs. Simply cut joiners to fit at window heads, sills and eaves as required.
RESIDENTIAL WIND TABLE - AS 4055 WIND CLASSIFICATION
Last Updated: 20th March 2025
Subscribe
Sign up for exclusive Weathertex tips and trends sent straight to your inbox